Showing posts with label syrup. Show all posts

Bruschetta Chicken


    It’s probably unusual for an idea for a recipe to originate with a disappointment. This one did.


    Earlier this year, while having dinner at a popular chain restaurant, I ordered a dish they called Bruschetta Chicken. It sounded good and, truth be told, it was, but there was nothing about it that said bruschetta to me. Deconstructed bruschetta? Maybe. But not bruschetta. I decided, right there in the restaurant, to create the Bruschetta Chicken I saw in my head when I first read the name: a comically large but otherwise normal bruschetta, a seasoned chopped tomato mixture on a toasted slice of good Italian bread normally served in much smaller portions as an appetizer, except topped with chicken. A kind of “Bruschetta a la Flintstone.”


    It took awhile to get around to, but I’m happy to present the recipe below for what I have to believe is the world’s largest bruschetta. (To give a sense of scale, one Italian bread, which normally makes a dozen or more appetizer size bruschettas, is used here to make four meal-size ones.) A few comments before we get to the recipe itself:

    • Although this could be made with boneless chicken breast or chicken tenders, I used drumsticks and trimmed the meat off after they were cooked. This took longer than using one of the boneless chicken parts, but also gave me the advantage of cooking the chicken bone-in, which enhances the moisture and flavor, and also allows the person doing the cooking to decide whether to keep the skin on or go skinless.

    • I would be remiss not to acknowledge the braising liquid as being based on one created by Anne Burrell, my favorite culinary mad-woman, and the idea of roasting the tomato topping mix (instead of just using it cold as in the usual bruschetta method) as being from Rachel Ray. The shoulders of giants, and all that…


    This recipe makes 4 meal size bruschettas.


    Using paper towels, dry the outside of 1 pound of chicken breast or tenders, or two pounds (about 6) drumsticks. Season the chicken with salt and fresh ground black pepper.


    Add just enough olive oil to a large, hot pan to coat the bottom. Add the chicken and cook till browned (usually about 6-8 minutes per side), turning as each side is done. When the chicken is browned, set it aside.


    Pour 2 cups of dry white wine (I use chardonnay) into the same pan and simmer till reduced by half. Add 4 cups fat-free chicken broth; 1 tablespoon fresh thyme or 1 teaspoon dried thyme; and 1 tablespoon fresh rosemary or 1 teaspoon dried rosemary to form a braising liquid. Stir to combine and add the browned chicken. Cover and simmer for about 30 minutes. While the chicken is browning and braising, prepare the tomato mixture and bread as described below.


    To cut the Italian bread into large bruschetta pieces:

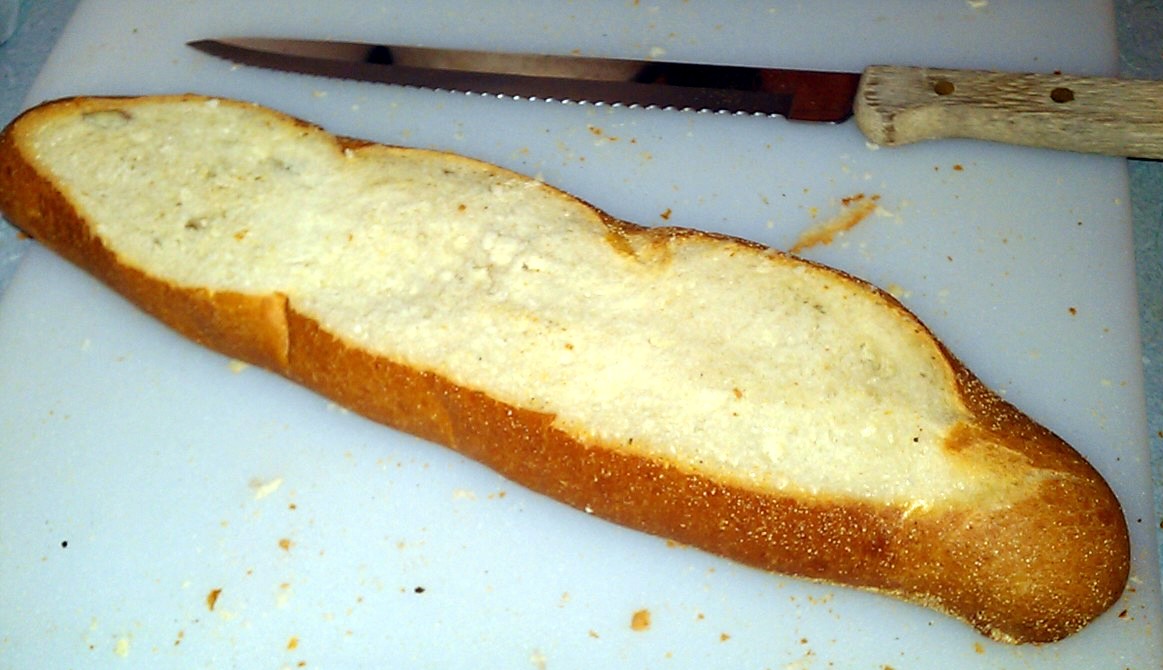
    • Working length-wise, cut away just enough of the top and bottom crusts to expose the soft bread inside.

    • Cut the bread in half along the short dimension.


    • Cut each of those pieces in half horizontally. The result should be four similar pieces, each half the length of the original bread and with exposed bread on the top and bottom and crust on three of the four edges. 


    Pre-heat the oven to 400 degrees. While the oven pre-heats, combine the following in a bowl: one 28 ounce can diced plum tomatoes (drained but not rinsed); 2 tablespoons of olive oil; 1-1/2 tablespoons of dried basil or 4 tablespoons of chopped fresh; 2 teaspoons balsamic vinegar; 3 tablespoons finely chopped onion; 2 cloves finely chopped garlic; and salt and pepper to taste.


    Place the tomato mixture in a baking dish, and spread the bread out onto a baking pan in a single layer. Place both in the oven and bake for 15-20 minutes till the bread is crisp, turning the bread over half-way. Keep an eye on the bread so that it doesn’t burn.


    Rub the tops of the bread with two whole garlic cloves (using ½ clove per bread slice), and drizzle the tops lightly with olive oil.


    Divide the chicken evenly onto the bread slices. (If using drumsticks, cut the chicken off of the bone before putting the pieces on the bread.)


    Cover each with the tomato mixture, and top with a pizza-type cheese mixture. (I used a packaged Kraft reduced-fat Italian cheese mixture of mozzarella, provolone and parmesan, but anything along those lines should do as well.) Be careful not to overdo the cheese; remember, the finished dish should resemble a bruschetta, not chicken parmesan.


    Put the baking tray back in the oven only until the cheese melts, being careful not to burn the bread. Serve warm or hot with side dishes of choice. (In the photo at top, I served the chicken bruschetta with mini rotini pasta and tomato sauce, and a tossed salad. To tie all the parts together, the wine is the chardonnay used to braise the chicken.)

    Bonus Recipe: I recently started including with each week's recipe a link to a previous Kissing the Cook recipe so that folks who weren’t “in the family” when it was first published can get a look. This week’s bonus: Fluffy (and Reduced Fat!) Blueberry Pancakes with Fresh Made Strawberry Syrup.


    Hope you enjoy having these very special bruschettas! And don’t forget to visit again next week for another easy, delicious, kitchen-tested recipe. Till then, stay well, keep it about the food, and always remember to kiss the cook. ;-)

Pan Fried From-Scratch Cheese Grits with Homemade Mixed Berry Syrup

    Even a life-long north-easterner (pronounced, “Yank-ee”) like me knows that if you’ve never had well-made grits, you’re missing out on something special.

    Grits are generally made from either hominy or cornmeal, the difference being that, for  hominy, the dried corn is treated with lye to remove the germ and hard outer shell before the corn is ground. (Like sausage, it’s best just to enjoy hominy grits without thinking too much about how it’s made.) Real hominy being hard to find in some places, most home-made grits are made with coarse, stone-ground cornmeal. Grits are a member of the same dried-corn porridge family as polenta and corn meal mush. (The latter may sound like a derogatory term, but it’s what the dish is actually called.) What are the differences between grits, polenta, and cornmeal mush? The easy answer is that polenta is made from cornmeal a bit finer than the coarse kind used for grits, and mush is made from a cornmeal that’s finer still. Like most easy answers, though, there’s still a lot of disagreement among folks who know. The important thing, if you’re making cornmeal grits, is to use coarse, stone-ground cornmeal. Use something too fine and the texture of the finished product won’t be right.

    Although grits can be made part of any meal – shrimp and grits, for example, is a classic southern dinner – they’re often made for breakfast. One common approach is used in this recipe: the grits are put into a loaf pan and allowed to cool overnight to a form a loaf. Come morning, the loaf is cut into slices, coated with egg, and pan fried till they look something like pancakes. Add your favorite syrup or similar topping, and you’ve got a seriously good breakfast. (In the photo above, I combined them with turkey bacon, fried egg substitute, and a slice of home-made cranberry-banana bread. It tasted wonderful.)

    This recipe makes a loaf half the size of a two-pound loaf pan. I’m going to call that 4 – 6 servings, though how many slices make a “serving” is, in this case, very much a matter of individual judgment.

    A couple of other items to note:
    • If you’d rather serve the cheese grits in the usual way instead of making a loaf, you can. Just skip the steps that involve pouring the grits into a loaf pan, letting them cool into a loaf, slicing the loaf, and pan-frying the slices.
    • Even though making the grits from scratch using cornmeal is easy, some folks may still prefer to use packaged grits to make the loaf. If so, it’s not a problem; just make the grits as per the directions on the package, and pick up the recipe from there.
    • Cheese grits are usually made with cheddar cheese, but you can use any you like. In this recipe, I used goat cheese. The important thing is that the cheese you choose should melt well.
    To make the grits:

    Heat one quart of fat-free half-and-half in a heavy-bottomed pot over medium heat just until steam begins to rise from the surface. (Overheating, or heating too fast, may cause the half-and-half to separate.)

    Add ½ tablespoon of kosher salt to the half-and-half, and then slowly add 1 cup of coarse stone-ground white cornmeal, whisking constantly while the cornmeal is being added.

    When the cornmeal is incorporated into the half-and-half, lower the heat, cover, and let the mixture cook and thicken till smooth, about 15 minutes, whisking thoroughly about every 2 – 3 minutes. (If you’re using packaged grits instead of making them from scratch, make one quart of the grits as per the directions on the package and pick up with the next step.)


    Remove the pot from the heat, and add ½ teaspoon of fresh ground black pepper, 3 tablespoons of butter substitute, 4 ounces crumbled goat cheese (or other desired cheese), and a few drops of hot sauce to taste. Mix until well combined to form cheese grits. (If you want to serve the grits as is without forming the loaf, this is when to serve them.)

    Pour the grits into a buttered loaf pan, cover with foil, and refrigerate overnight until the grits forms a firm, gelatinous loaf that can be turned out onto a cutting surface.

    Melt butter substitute in a skillet. While the pan is heating, cut the loaf into slices ½” – ¾” thick. Dip the slices to be fried in egg substitute to coat.

    Pan fry each side till well-browned, about two minutes per side. Serve immediately, topped with syrup or other desired topping.

    As an extra bonus, let’s make the mixed berry syrup shown in the plate in the photo. (This recipe makes about one pint, so you’ll have plenty left over for other delicious meals!)

    Put a small glass plate in the freezer.

    Put 1 cup of sugar and the juice of one lemon in a saucepan, and mix till combined. Turn the heat on very low. When the sugar-lemon mixture has just melted (don’t let it burn!), add 1 pound of mixed berries (frozen ones that you’ve thawed will work just fine), 1 tablespoon of butter substitute, and ¼ teaspoon of ground nutmeg. Mash the fruit and let it cook down, stirring often. Every so often, put a few drops on the glass plate you chilled in the freezer to check the texture. When the syrup on the plate is the texture you want, remove the saucepan from the stove and pour the syrup into a container. Seal the container and refrigerate until ready to serve.

    So there you have it: cheese grits from scratch, pan fried to deliciousness and topped with home-made mixed berry syrup. Life is good, folks.

    If you prefer your recipes in cookbook-style format, just send me a note and it will be sent!

    Hope to see you next week for another tasty, reduced fat recipe! Till then, stay well, keep it about the food, and always remember to kiss the cook. ;-)

Strawberry-Rhubarb Pastry Ravioli


    The origins of Strawberry-Rhubarb Pastry Ravioli go back several years. I was preparing a pie and had leftover dough trimmings. Such leftovers are normal, of course, but I was determined not to waste anything, even the scraps. I think when you make the dough yourself you feel a little parental toward it and want to give it every chance to make something of its life.

    Whatever the reason, I took small roll-outs of the dough, placed some preserves on them, topped them with another small dough roll-out, and baked it till it looked something like a ravioli. They tasted pretty good. Elated and proud, yet disarmingly modest for someone who had just revolutionized the culinary world, I took time out from writing the speech I was going to give when awarded the Nobel Prize for Pastry to showed my great invention to my wife. She informed me that baking preserves between two pieces of pie dough was something mothers had been doing with small children to keep them occupied for about as long as there have been preserves, pie dough and, for that matter, small children.

    Oh well, I thought. Back to the cutting board.

    Despite the idea’s childish roots (or maybe because of them), it stayed in my head until, a couple of weeks ago, Facebook friend and, let me be sure to mention, award-winning and published baker Isabel asked me when I was next going to have a recipe for something sweet. It seemed a chance to explore the pastry ravioli idea again, this time bringing more experience to the process and taking it up a level or two. Experience, in this case, meaning:
    • Using a strawberry-rhubarb filling instead of jarred preserves;

    • Cutting the pastries with a ravioli cutter and topping them with fresh strawberry syrup made to resemble tomato sauce; and

    • Topping the “sauce” with shaved white chocolate to resemble fresh-grated parmesan.

    I’ve always said one of my favorite ingredients is whimsy. Fun food tastes good!

    This recipe makes about sixteen 2-1/2” pastries. You’ll need two pie doughs which you can either buy, make using your favorite recipe, or click on the link for a reduced fat pie dough that really works.

    Start by hulling one pound of fresh strawberries and dividing them into two equal piles, one for the filling and one for the topping.

    To make the filling, combine the following in a bowl, mix well, and cover and refrigerate until ready to use: ½ pound of the strawberries, finely chopped; 1-1/2 cups (about 1-1/2 large stalks) of red rhubarb, finely chopped; ¾ cup sugar; 1-1/2 tablespoons of corn starch; ½ tablespoon of all-purpose flour; ¼ teaspoon fresh lemon zest; ¼ teaspoon fresh lemon juice; ¼ teaspoon cinnamon; and ½ teaspoon vanilla extract.

    Begin preheating the oven to 425 degrees.

    On a floured surface, roll one of the pie doughs into a thin pastry. Being careful not to cut the dough, use a ravioli cutter to lightly mark where the dough will be cut into individual pieces. Lay out as many pieces as possible.

    Draining each spoonful as much as possible, place about a teaspoon of filling onto the center of each marked piece. (You will probably have filling left over.) Place a small dab of butter substitute on top of each mound of filling.

    On another floured surface, roll out the other pie dough to the same thickness as the first. Place the second dough on top of the first and lightly press down around the mounds formed by the filling.

    Brush an egg wash (1 tablespoon of water mixed with either one egg substitute egg or 1 beaten fresh egg) to the top dough. With the mounds as a guide, use the ravioli cutter to cut separate pastries that look like ravioli. Place the pastries on a parchment-lined baking sheet.

    Bake the pastries at 425 for 10 minutes. Lower the temperature to 375 degrees and bake until lightly golden, about 35 minutes, turning the baking sheet half-way.

    While the pastries are baking, let’s make our strawberry “sauce” topping.

    Place a small glass plate in the freezer. (This method of checking the final cooled thickness of the topping while it’s still hot comes to us from the world of jelly-making.)

    Place ½ cup of sugar and the juice of ½ lemon into a medium saucepan. Mix until combined, then heat over a low heat until the sugar mixture is melted. (Keep an eye on it; you don’t want this to burn.)

    Crush the remaining ½ pound of hulled strawberries by hand into the saucepan. (Crushing by hand will give the finished topping a lightly chunky appearance similar to tomato sauce.) Add a pinch of nutmeg and ½ tablespoon of butter substitute. Cook the mixture down to the desired “sauce” thickness. (You can check the thickness of the cooled liquid by placing a few drops of the hot liquid onto the plate you put in the freezer and letting it cool.)

    When the pastries and topping are done, let them rest until cool.

    The cooking is done; now it’s time for the stagecraft.

    After the pastries and topping have cooled, lay the pastries on a serving plate similar to ravioli and top with the strawberry “sauce.” Shave white chocolate on top of the sauce, giving it an appearance similar to parmesan cheese on tomato sauce.

    As always, if you prefer a cookbook-style, notebook-ready version of this or any other recipe you see here, just give a holler (along with your e-mail address) and I’ll get it right out.

    See you next week with another recipe for something tasty and reduced fat! Till then, stay well, keep it about the food, and always remember to kiss the cook. ;-)

Pomegranate Chiffon 123 Dessert

    I have to confess to being very excited about this week’s recipe, Pomegranate Chiffon 123 Dessert. Forget the fancy-sounding name; this is a delicious - and very retro - tribute to a much-beloved mainstream classic.

    Anyone old enough to have been aware of his surroundings in the late 60’s and early 70’s will no doubt remember a dessert-fad called Jello 1-2-3. The folks at Kraft found a way to apply colloidal solution technology (whatever that is) to their venerable staple, Jello, and create a special formula that, properly prepared, would separate into three uniquely textured layers while cooling.  It enjoyed a good popularity for a time, and gradually faded out until being discontinued in 1996. Although this specially formulated Jello is no longer available, the concept – and the memory - still enjoy a very devoted following.

    Recognizing this, Kraft includes on their web site a recipe for using their regular Jello formula to make a layered dessert in the spirit of Jello 1-2-3. It's a good recipe (although it separates into two layers, not three), but there's one problem: it uses their regular Jello product.

    Let me be clear: I like Jello. It’s just that the flavor is never quite what it’s supposed to be. (Ask someone what their favorite Jello flavor is, and they’ll probably say something like, “red.” Yes, it’s supposed to be strawberry, but let’s be honest: have you ever taken a bite of red Jello and said, “Mmmm…sure tastes like strawberry!” My guess is that you haven’t.)  Red is supposed to be a color, not a flavor.

    To remedy this, we know it’s possible to put fruit juice into unflavored gelatin and create a dessert that really is the flavor it claims to be.  So why not bring those two concepts together, create a layered chiffon gelatin that really tastes like something, say pomegranate, and sandwich the pomegranate’s tartness between the sweetness of a graham cracker base at the bottom and a fresh strawberry syrup garnish on top?

    I believe you will like the result. A lot.

    You’ll note the recipe uses Cool Whip which, by astonishing coincidence, is also made by Kraft. Regular readers know I normally prefer fresh whipped cream to packaged whipped toppings, but whipped topping has one (and only one) advantage over fresh whipped cream that is important to the chemistry of this particular recipe: it doesn’t break down quickly the way fresh whipped cream does.

    This recipe makes an 8” x 8” baking dish size dessert that divides nicely into 9 servings. The only special considerations are the need for a blender, and freezing about 1-1/2 cups of your juice into ice cubes before starting.
    Begin by preparing a graham cracker crust in an 8” x 8” baking dish. (Click here for a link to my recipe for pineapple pudding pie that includes a graham cracker crust made with reduced-fat ingredients.) Once the crust is made, it must cool completely before you prepare the gelatin-chiffon mixture.

    Only after the graham cracker crust has cooled, put 1-1/2 cups of pomegranate juice (or pomegranate juice mixture) in a saucepan and bring to a boil. Sprinkle in two 0.3 ounce packets of unflavored gelatin and stir about two minutes till the gelatin powder is completely dissolved.

    Pour the hot juice into the blender. Add the 1 cup of cold juice and 1-1/2 cups of frozen juice (ice trays work best), and blend until smooth (about 30 seconds).

    Add 1 cup of Cool Whip and blend until completely incorporated into the juice mixture.

    Pour the blended liquid into the baking dish on top of the crust. Almost immediately, the liquid will begin to separate into a darker gelatin layer on the bottom, and a lighter chiffon layer on top. Refrigerate for at least three hours till the gelatin and chiffon set.

    After the dessert has set, garnish the top with strawberry syrup and cut into 9 equal squares to serve. (Click here for a link to my recipe for fluffy reduced-fat blueberry pancakes that includes a fresh-made strawberry syrup that has chunks of strawberry. To make a smooth syrup instead of a chunky one, use the same recipe except puree, rather than chop, the strawberries.)
    And there it is: a dessert your family and guests will enjoy even if they’re not old enough to remember the classic that inspired it.

    If you'd like a cookbook-style, notebook-ready copy of this recipe, drop me a line (including your e-mail address) and it will be sent. 

    See you next week with more food that's as much fun to make as it is to eat. Till then, stay well, keep it about the food, and always remember to kiss the cook. ;-)