Showing posts with label pasta. Show all posts

Lasagna-Inspired Double-Stuffed Manicotti

    I recently received an e-mail from loyal reader Judy asking if I had a good recipe for manicotti. Having no manicotti recipe, good or otherwise, got me thinking it was time to put one together.


    For some reason, this also started me thinking about lasagna, and thus evolved this week’s recipe: Lasagna-Inspired Double-Stuffed Manicotti. The idea is simple: prepare manicotti pasta that’s a bit longer than normal. After you place your cheese filling and roll the pasta around it, spread seasoned meat filling over the remaining portion of the pasta, and continue to roll that around the cheese filled part. This creates a double-rolled manicotti with cheese in the inner roll and seasoned meat in the outer roll. Top it with sauce and some mozzarella, bake, and the result is simply delizioso!

    Some Cook’s Notes before we begin.
    • The recipe uses hand-rolled pasta from scratch. Don’t be put off; it’s actually pretty easy. (I also used a wood rolling pin on a wood cutting board to roll the dough, which gives the finished pasta a slightly rougher texture than you'd get using a pasta machine; that roughness really holds the sauce.) Many people use store-bought manicotti shells, store-bought lasagna strips, or crepes made from a thinner pasta batter for their manicotti. Because this recipe has the pasta being rolled over twice, store-bought manicotti shells just won’t work. Either of the other two ways should be fine if you decide not to make your own pasta dough.

    This recipe makes 8 large manicotti. That translates to 8 normal human portions, or 4 big-eater portions.

    First, let’s make the pasta:

    In a large bowl combine 2 cups all-purpose flour, ½ teaspoon salt, and 1 teaspoon dried parsley.


    Make a well in the center of the flour mixture. Put 1 teaspoon of olive oil and 3 egg-substitute eggs into the well and whisk the wet ingredients together.

    After the wet ingredients are mixed, gradually stir in the flour mixture until a dough forms.


    Knead for about five minutes until dough is smooth and elastic.


    Wrap the dough in plastic wrap, and let rest while you prepare the remaining items, but not less than 20 minutes.


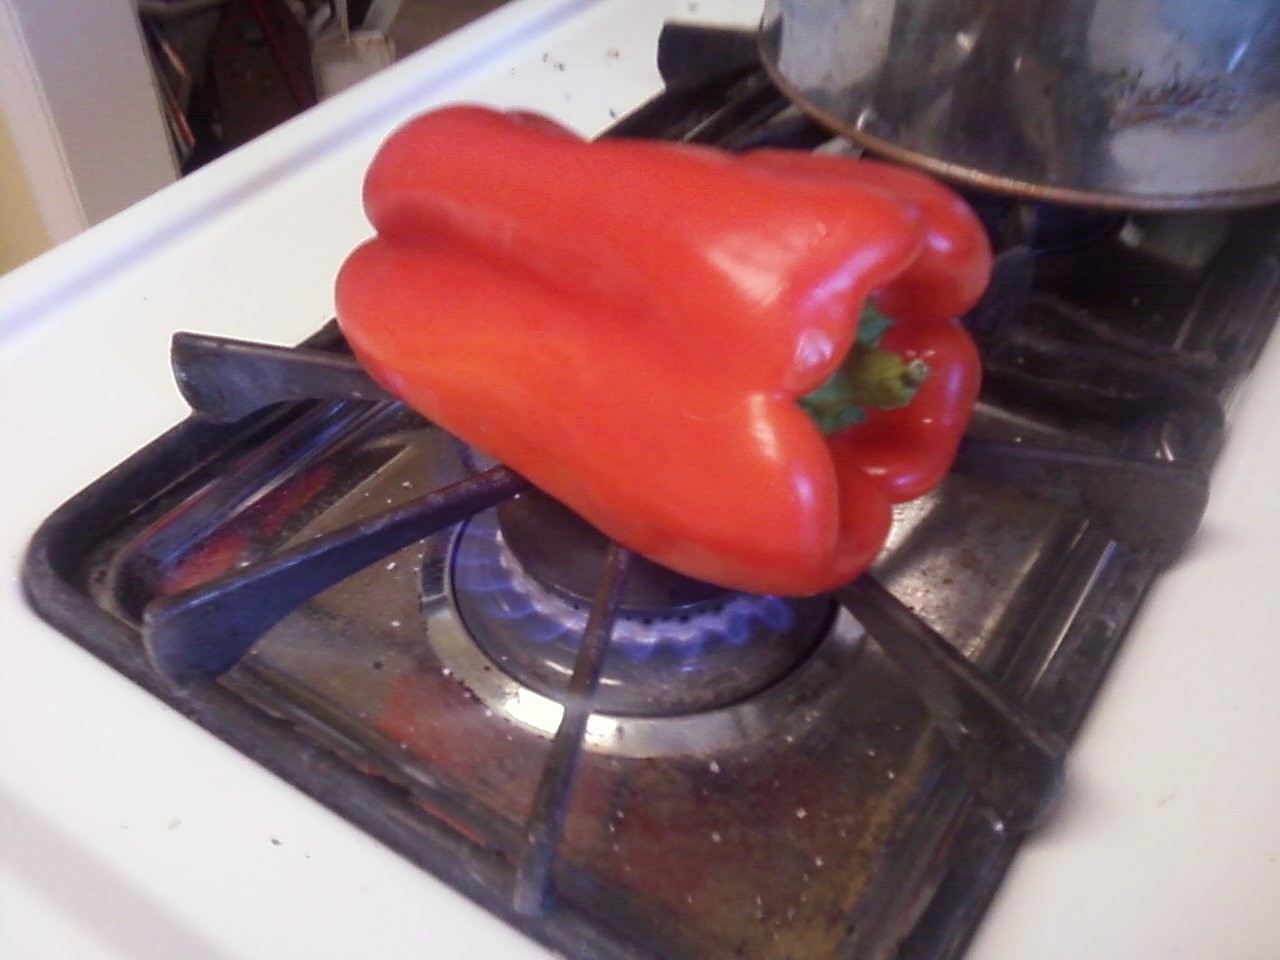
    To roast the red peppers:
    Place the peppers directly on the stove burner. Give them as much flame as you can without having the flame touch the pepper. As each side blackens, use tongs to turn the pepper till all sides are blackened. When the peppers have blackened on all sides, wrap them in foil and let them steam themselves until cool enough to handle, about 20 – 30 minutes.

    Once the peppers are cool enough to handle, use your fingers to remove the blackened outside skins. Dice the peppers and set aside.

    To make the meat filling:

    Preheat the oven to 350 degrees.

    In a bowl, combine 1-1/2 pounds of ground turkey and the following: 1-1/2 tablespoon red wine vinegar; ½ tablespoon salt; ½ tablespoon fresh ground black pepper; 2 teaspoons dried parsley; ½ tablespoon garlic powder; ½ tablespoon onion powder; ½ tablespoon dried basil; 1 teaspoon paprika; 1 teaspoon crushed red pepper flakes (for medium-hot sausage; more or less to taste); 1/4 teaspoon ground fennel seed; a pinch of brown sugar; a pinch of dried oregano; and a pinch of dried thyme.

    Put 2 tablespoons of olive oil in a skillet. Add two cloves of chopped garlic and 1 medium diced onion. Cook until the onion is translucent. Add the turkey mixture and cook until it is browned.

    Add 6 ounces of tomato paste and roasted red peppers for about the last minute of cooking.


    To make the cheese filling:

    In a bowl, add 2 cups of ricotta cheese and 2 egg-substitute eggs, and mix till combined. Add 1 teaspoon dried oregano, 1 teaspoon dried basil, and 1-1/2 cups of grated parmesan.
    To prepare the manicotti:

    Lightly brush a 13” x 9” baking dish with olive oil, and spread just enough marinara sauce inside to cover the bottom, about ½ cup.

    Cut the pasta dough into eight pieces. Repeat the steps below for each of the pieces. (Keep unused dough wrapped in the plastic to prevent drying out.)
    • On a well-floured surface, roll on piece a rectangle about 1/16” and as close to 6”x 9” as you can manage. (The dimensions won’t be exact and it won’t be a perfect rectangle; it’s ok.)
    • About 2” from one of the short edges, put about ¼ cup of the cheese mixture.


    • Fold the 2” piece over the cheese, and roll slightly to enclose it completely, leaving a little more than half of the pasta piece still unrolled.


    • Put some of the meat mixture (1/3 – ½ cup) on the unrolled portion of the pasta, enough to cover it while leaving some uncovered pasta at the far end.


    • Carefully roll the cheese-filled portion over it until it is enclosed by the meat-filled portion.


    • Repeat the above steps for all the pasta pieces, placing each in the baking pan as they are finished.


    When all the rolled pasta pieces are in the baking dish, cover with 2 cups of marinara sauce and 8 ounces of grated mozzarella cheese.

    Bake until bubbly, about 30 minutes.

    Remove the manicotti from the oven, sprinkle the top with dried parsley, and let it rest for 5-10 minutes before serving.

    Add a nice dry Italian red wine and you’ve got yourself a fresh-made meal that everyone will love. Buon appétito!

    For a cookbook-style copy of the recipe in .pdf format, just click here

    Please visit again next week for another home-made recipe! Till then, stay well, keep it about the food, and always remember to kiss the cook. ;-)


Chicken Pasta Primavera

    Needless to say, I have great respect for the high level techniques of master chefs. Nevertheless, the difference between an “ok” dish and a really good one is often a matter of one or two simple changes all of us can do, and I believe one of the most fertile and fascinating areas of cooking is the study of simple tweeks and methods that can make the difference. It is this idea that formed the foundation of this week’s recipe, Chicken Pasta Primavera.

    The concept is simple enough: pasta and vegetables topped with cooked chicken. In this version, the pasta is cooked the usual way, but in chicken broth rather than water, adding extra depth of flavor. I also decided to avoid the easy choice of boneless breast for the chicken, and noodles or a long pasta. I opted instead for drumsticks and shell pasta. There’s nothing wrong with boneless breast, noodles, or long pasta, of course, but something about putting together another chicken-breast-on-noodles dish seemed visually boring to me. My thinking was that you judge how any dish looks before you ever get to judge how it smells or tastes. Needless to say, feel free to use whatever chicken parts and pasta you like.

    Plus, this recipe also has you doing that really cool thing where you roast a red pepper directly on the stove burner. (If you’ve never done it, fear not: I took pictures.)

    This recipe makes four servings. We’ll start by making the herb mix for the marinade and pasta.

    To made the herb mixture, combine and finely chop 1 tablespoon of fresh parsley, 1 tablespoon of fresh oregano, ½ tablespoon of fresh rosemary, ½ tablespoon of fresh thyme, ½ tablespoon of fresh sage, and ½ tablespoon of fresh mint leaves. (If you make extra, it tastes great in scrambled eggs too.)

    Next, we’ll make the marinade and marinate the chicken.

    In a large sealable plastic bag, combine 2 tablespoons of olive oil, 2 tablespoons of fresh lemon juice and 1 tablespoon of the herb mix to form a marinade. Add the 8 chicken drumsticks and set in the refrigerator for 3 hours, turning occasionally.

    After the chicken has finished marinating, we’ll continue with the remaining steps.

    Preheat the oven to 350 degrees.

    Cook 1 pound of pasta as per the instructions on the box, but using the 2 – 3 quarts of fat-free chicken broth instead of water. Continue with the rest of the recipe while the pasta is cooking.
    Roast a red pepper on the stove burner. To do this, you literally place the pepper directly on the burner. Give it as much flame as you can without having the flame touch the pepper. As each side blackens, use tongs to turn the pepper till all sides are blackened. Set the pepper aside until it is cool enough to handle, then use your fingers to remove the blackened outside skin. What’s left will be a delicious roasted pepper than can be diced for addition to the finished pasta.

    Place pepper directly on burner.
    Turn so all sides blacken.
    Once blackened, set aside to cool.
    Dice for use in pasta.

    Add a little olive oil to a large heated skillet, and brown the drumsticks. (Just brown them, don’t cook them to completion.) After the drumsticks have browned, place them on a baking sheet and bake till done, about 45 minutes.

    Dice one medium onion and put it in the skillet you used to brown the chicken, adding a little olive oil if necessary, and cook until caramelized. Add 4 chopped garlic cloves, and  a pinch of red pepper flakes and cook for about a minute more. Add the roasted pepper, 4 cups of chopped fresh spinach, and the remaining poultry seasoning herbs. Season with salt. When the spinach has wilted down, add about 1/3 cup of the starchy pasta cooking liquid to the pan and cook for a minute to reduce it.

    Drain the pasta well and add it to the skillet. Toss the mixture to allow it to absorb the remaining liquid. Add salt and pepper to taste.

    After plating the pasta into four servings, top each plate with two of the drumsticks and drizzle with a little olive oil before serving.

    And there it is: Chicken Pasta Primavera!

    If you’d like a cookbook-style, notebook-ready copy of this recipe, let me know and you’ll have it in short order!

    See you next week with another recipe. Till then stay well, keep it about the food, and always remember to kiss the cook. ;-)

Chianti Sauce

    A warm welcome to new follower Shenae!

    In our last episode, we made a tasty no-cook, all-purpose tomato sauce. Today, we’ll use the sauce as one of the key ingredients of a Chianti sauce that’s great anywhere you might use the Vodka Sauce that inspired it. (The photo at right is similar to the one in last week’s tomato sauce article- sauce on fresh pasta, topped with baked flounder - except the plate in the foreground is topped with the Chianti Sauce. For comparison, the plate in the background has the tomato sauce.)

    If you’ve ever made Vodka Sauce, you know that while it’s simple to make, it requires a bit of patience; the cream needs to be added slowly so it doesn’t separate and ruin the sauce. Chianti Sauce is similar, using Chianti in place of vodka, and substituting fat-free half-and-half in place of the traditional cream. (As a general rule, I’ve found that if you’re cooking creamy things but want to make them reduced-fat, fat-free half-and-half is your friend.)

    This recipe makes about 3 pints of sauce. You’ll be making it in a pan on the stove-top, so be sure the pan you use is deep enough to contain all the ingredients.
    Warm 2 tablespoons of olive oil in a deep pan. Saute 1 tablespoon of diced onion and 1 tablespoon of finely chopped garlic until the onions are transparent but not brown.

    Remove the pan from the heat and add 1 cup of Chianti. (The mixture won’t usually flame up, but if it does, it’s ok. The flames will stop in short order.) Put the skillet back on the stove and cook till the volume is reduced by about half.

    Reduce heat to low. Add 2-1/2 cups of tomato sauce (either the one from last week’s recipe or any other) and stir to combine. (I also added fresh mushrooms to mine at this point, but feel free to leave that out if you so desire.)

    Ok, here where the patience part comes in. Whisk in 1 quart of fat-free half-and-half slowly, adding it no more than ¼ cup at a time, and stirring constantly to keep the half-and-half from separating. As you add each bit of the half-and-half, be sure to blend it into the sauce completely before adding the next bit. (Adding the entire quart should take at least 10 minutes.)

    After all of the half-and-half is incorporated and the mixture just starts to bubble, add 1 cup of grated parmesan cheese and 2 tablespoons of chopped rosemary.

    Cook the sauce over low heat, stirring constantly for about 25 minutes, until the sauce is the desired consistency. Add salt and pepper to taste, and you’re ready to top your favorite dish and serve.
    And don’t forget to pour yourself a glass of the remaining Chianti. No sense wasting it, you know!

    As always, if you’d like a cookbook-style, notebook ready copy of this recipe, ask and it shall be sent!

    See you next week with something special, for someone special. Till then, stay well, keep it about the food, and always remember to kiss the cook. ;-)

The Raviolo and I

    Raviolo: a word so obscure, even Microsoft Word's spell-checking software doesn’t recognize it. Its better know plural, of course, is ravioli. By either name, though, this wonderful cheesy-stuffed pasta pillow is not only delicious to eat; it’s also easy and fun to make. If you’ve never made it (or any other fresh pasta) before, I invite you to try now; you’re in for a real treat, not to mention a real sense of accomplishment once you’ve seen and tasted what you made. And you won’t need a pasta machine. (I didn’t even own one until earlier this week, but that story’s a future post.)

    My introduction to home-made ravioli was a pasta class I took several years ago at the culinary arts school of a local community college.  The pasta chef teaching the course excitedly brought out the school’s brand new restaurant-grade pasta machine, an impressive multi-gadgeted electric device only about the size of a household toaster but costing a couple of thousand dollars. Or at least it was impressive until the machine started shutting down from the motor overheating every time someone tried to use it. A few in the class decided to stay with it, enduring a continuous cycle of press, overheat, wait for it to cool down and then try turning it on again. I opted for the other type of pasta maker, the round wooden kind that never overheats or breaks down, also known as a rolling pin. That’s one of the most encouraging things about making pasta; people did it centuries before any of the fancy kitchen equipment we have today was invented.

    Both the pasta dough and the filling are easy to make. The dough described follows a traditional recipe. The filling features Fontina cheese. I wasn’t familiar with it until recently, when I heard Bobby Flay make an off-handed remark on a Throwdown rerun about Fontina being one of the best cheeses there is. Once I heard that, I had to get some and find out what he was talking about. My first taste of its wonderful Italian aura immediately screamed ravioli.

    The dough for about two dozen ravioli (more or less, depending on how big you make them) begins in a large bowl into which you put 2 cups of all-purpose flour and ½ teaspoon of salt. Mix them until they’re combined and then form a well in the middle of the flour-pile. Into the well, put three egg-substitute eggs (or, if you like, three real eggs), and a teaspoon of olive oil. Mix them together using your hand, first combining the wet ingredients with the inner-most part of the flour pile, and gradually working your way outward until all the flour is incorporated to form a dough.

    [Before we go further, I must add the following remark. There’s a good chance you’ve seen someone make pasta dough as described above, except without the bowl; in other words, with the flour piled directly on the kitchen counter. That’s the most authentic way, but it’s hard to do with only two cups of flour without making a mess once you start mixing in the wet ingredients. If you really want to try it, I suggest waiting until you’re making at least a double-batch of dough.]

    Knead the dough for four to five minutes until it’s smooth and elastic, flouring your work surface as necessary during the kneading. After kneading, cut the dough ball into quarters. Wrap each quarter in plastic wrap and let them rest for 20 minutes while you mix the filling.
    The filling, though delicious, couldn't be simpler to make.

    Just put the following ingredients into a bowl and mix well until they’re combined: 1 cup of Ricotta cheese, 3/4 cup of grated Parmesan cheese, 3/4 cup of fresh grated Fontina cheese, 1 egg-substitute egg, 2 tablespoons of fresh chopped parsley, ½ teaspoon of garlic powder, and salt and pepper to taste.

    So now you’ve got your dough, and you’ve got your filling. Next stop: home-made ravioli!

    Beginning with the first quarter-portion of dough (and keeping the remaining portions covered to keep them from drying out), roll the dough out on a well-floured surface into something as close as you can to a square about 12” on each side and 1/16” thick. Using a cooking cutter, cut out as many pieces as you can. (Remember, each raviolo will require two of the pieces.) Place a generous teaspoon of filling on the centers of half of the pieces; using your finger, coat around the edges of those pieces with egg-substitute (or a real egg, beaten) and place an identical dough shape on top. Press the edges down onto the egg with your finger, then with a fork to seal. Done right, the egg will keep the ravioli from opening up later in the cooking water.
    And that's it! As you finish the ravioli, either put them aside (if you’re going to cook them right away), or place them on a baking sheet covered with parchment for freezing later. In either case, cover them to prevent drying out while you repeat the above with each of the remaining pasta quarters.

    Remember that fresh pasta generally cooks faster than the packaged kind. The ravioli will generally cook in about 7 minutes, but check them often for doneness. If you choose instead to freeze them, put the ravioli in the freezer on the baking sheet first; once they’re frozen, put them together in a plastic bag for storage. (If you put the ravioli together in the bag before they’re frozen, they’ll likely stick together.)

    Once the ravioli are cooked, all that remains is to top them off with your favorite sauce and some parmesan, and to enjoy the taste of fresh-made ravioli – and the fantastic feeling of having made them yourself!
    For a cookbook style, notebook-ready copy of this or any other recipe from this site, just drop me a line and I’ll get it right off to you. (I also hope to get a video of this recipe finished and available on You-Tube soon...stay tuned!)

    Thanks for visiting! Till next week, stay well, keep it about the food, and always remember to kiss the cook. ;-)