Showing posts with label recipe. Show all posts

Irish Potato Farls Breakfast


    A míle fáilte!

    With only six shopping days left till St. Patrick’s Day, I thought it would be good to celebrate with something a little more authentic than the usual mid-March atrocities that reduce Ireland’s rich culture to green bagels and paper leprechaun hats.

    The solution? An easy, delicious Irish Potato Farls Breakfast.

    Nobody does breakfast like the Irish. Northern Ireland, for example, has the Ulster Fry, the ultimate in heart-attack-on-a-plate decadence, consisting of two eggs, two sausages, two slices of bacon, two slices of black pudding (a mixture of onions, pork fat, oatmeal, spices, and pig blood), and two of the aforementioned potato farls. (To keep all of this from becoming unhealthy, some cooks add a tomato.)

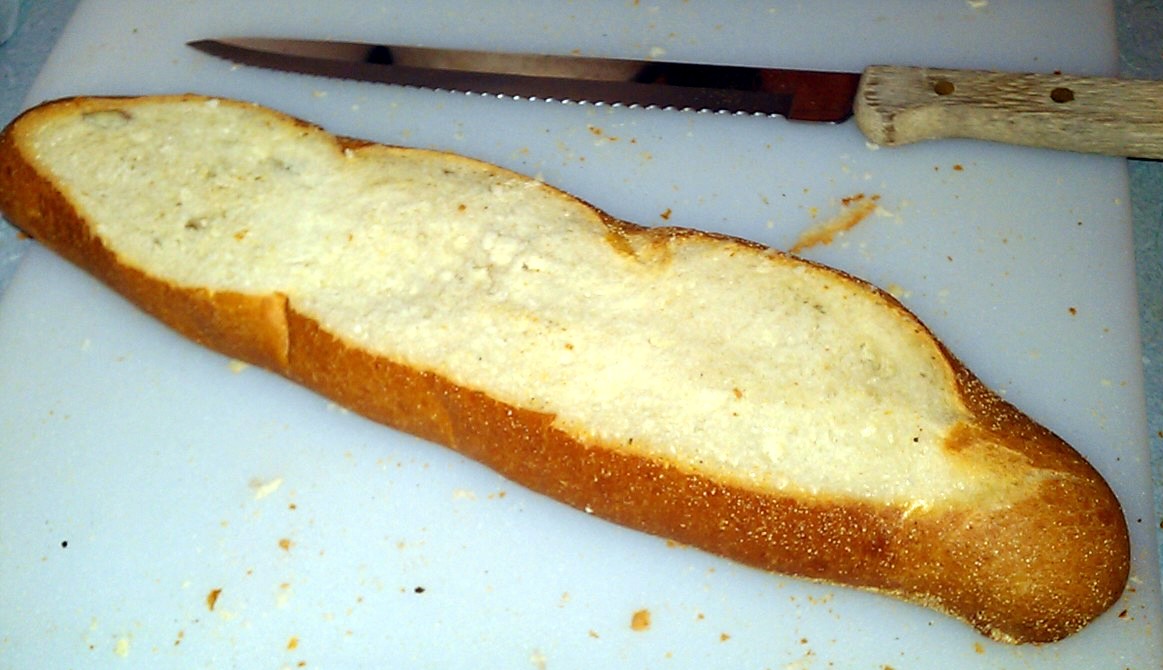
    Having dedicated my culinary life to making reduced fat food taste good, we’re going to put aside most elements of the Ulster Fry and concentrate on the potato farls, a delightful potato pancake that’s crisp on the outside and soft on the inside. (New Yorkers might be reminded of a knish.) The name comes from “fardel,” a Gaelic word meaning four parts. (As you’ll see, the rolled out potato dough is cut into four parts for cooking.) There are other varieties besides the potato kind: soda farls (an Irish soda bread dough flattened and cooked in a pan or griddle instead of being baked in an oven); wheaten farls (similar to soda farls but made with whole wheat flour); and treacle farls (made with treacle, which is similar to molasses).

    In this recipe, we’ll make a hearty breakfast by serving the potato farls with eggs topped with onions, herbs, chopped turkey sausage, and Irish cheese; turkey sausage with mustard; and a bit of fresh fruit. (If you want black pudding, you’re going to have to add that on your own.)

    Some Cook’s Notes before we begin:
    • Thanks to dear friend Sheila, she of “Norn Iron,” for starting me thinking about farls in the first place.
    • Traditional potato farls are made without the onion, rosemary and thyme used in this recipe. To season them for the American palate while still respecting Irish culture, I’ve added these items which, while not ordinarily found in farls, are often found elsewhere in the cuisine. Similarly, farls are generally made with boiled potatoes; I prefer to bake them for a little deeper flavor.
    • Farls are best eaten soon after cooking. Saved overnight, the outsides lose a lot of their crispness, and they’re just not the same.

    This recipe makes eight farls. (One is a good portion for most people; big eaters might want two.)

    On a griddle, cook enough turkey sausages to have two whole links per serving, plus one diced link to top each serving of eggs.


    Grate some Irish cheese to top the eggs you’ll be cooking.


    Bake 2 to 2-1/4 pounds of potatoes until tender. (Baking them in the microwave is recommended; otherwise, bake as you ordinarily would to serve baked potatoes.) After the potatoes are baked, cut them into pieces. As much as possible, do the remaining steps with the potatoes warm to hot.

    Put the pieces through a ricer or food mill. (You can use a masher, but the ricer or food mill will give a better texture since it doesn’t repeatedly beat up the starches in the potato the way a masher does.)

    Stir in 1-1/2 cups of all-purpose flour, 2 tablespoons of melted butter substitute, 3 tablespoons of minced onion, 1 teaspoon of dried rosemary, 1 teaspoon of dried thyme, ½ tablespoon of salt (more or less to taste), and ¼ teaspoon of fresh ground black pepper (more or less to taste).

    Mix until well combined into a dough-like consistency, adding up to ½ cup of additional flour if necessary to get the right texture. When the dough is mixed, knead lightly for a minute or two.

    Cut the dough ball in half. Roll out one of the halves to a circle about ¼” thick. (Tip: when rolling the dough, putting wax paper on top of the dough makes clean-up easier.)

    Cut the rolled-out dough into four wedges.


    Place the wedges on a lightly oiled hot griddle and cook till golden and slightly crisp on the outside, about three minutes per side. If you want to top your eggs with some additional chopped onion, you can place it on the griddle and cook it at the same time as the farls.

    Place the cooked wedges on a plate and cover with a clean towel while you repeat the rolling, cutting and cooking with the other half of the dough, and complete the remaining steps.


    Cook your eggs in whatever style you prefer, and top with the cooked onions, diced sausage, a bit of the rosemary and thyme, and some of the cheese.

    On each plate, put one or two farls, the eggs, two sausage links with mustard, and some fresh fruit as pictured above.

    Now that’s what I call a hearty breakfast, and just in time for St. Patrick’s Day. (On any other day of the year, too!)

    You can download the recipe by clicking here.

    Hope you enjoy this special treat. Hope, too, that you’ll be back next week for another fun, delicious recipe. (Why not also tell a friend who you think might enjoy what we do here!) Till then, stay well, keep it about the food, and always remember to póg an cócaire. ;-)

Half-the-Time Cinnamon Raisin Bread


    There are no problems, just opportunities.

    What started out as a problem – the plagiarism of one of my articles by another blog – opened the door to adding a new feature to this site that makes it easier to enjoy the dishes published here: a link at the bottom of the article to download a cookbook-style, notebook-ready copy of the recipe directly, in .pdf format. (Thank you for a great idea, Gitana!) Beginning with this week’s post, there is no longer a need to request a copy of the recipe via a separate e-mail, or to copy and paste the content of each article manually. With copying and pasting no longer necessary, it’s safe for me to adjust the settings so that it will no longer be possible. (As for the plagiarized material, efforts to have that removed are in progress.)

    And now, for your gastronomical pleasure, I am pleased to bring you Half-the-Time Cinnamon Raisin Bread. The recipe combines a one-hour roll dough, raisins rehydrated with pomegranate juice, cinnamon and sugar to create a crusty, delicious treat.

    A note about one-hour rolls and the dough used to make them. One-hour rolls are made with dough that has more yeast than regular dough, reducing time required for rising, proofing and baking to about an hour. In this recipe, the baking time is increased since we’re using the dough to make a loaf instead of rolls, but it’s still much less time than would be required for a regular dough.

    This recipe makes one loaf.

    Place 1-1/2 cups of raisins in a small bowl and add only enough pomegranate juice (usually about 6 ounces) to cover. Let the raisins rehydrate while you prepare the bread dough.

    Begin preheating the oven to 200 degrees.

    In a small bowl, dissolve two ¼ ounce packages of dry yeast and 3 tablespoons of  sugar in ½ cup of warm (about 110 degrees) water and let stand for 5 minutes. The mixture should become frothy.


    Mix 3 cups of all-purpose flour, ½ teaspoon of baking soda, and 1-1/2 teaspoons of salt together in a large mixing bowl.


    Add the yeast mixture, 1 cup of skim milk and 2 tablespoons of melted butter substitute. Mix while adding an additional cup of flour, 1/2 cup at a time, to form a dough.

    When all of the flour is incorporated, knead the dough for 5 minutes, adding up to ½ cup of additional flour only if necessary for a smooth texture.Temporarily remove the dough from the bowl and place it on a lightly floured surface. Wipe the bowl out, rub the inside with butter substitute or a flavor-neutral oil,  and place the dough back in to the bowl.

    Turn off the oven. Cover the bowl with foil greased with butter substitute or flavor-neutral oil, and place it in the warm oven till doubled in size, about 25 minutes.


    While the dough is rising, combine the 1-1/2 teaspoons of cinnamon and 3 tablespoons of sugar. Also, drain the raisins very well and toss them with 2 tablespoons of flour.


    Prepare a floured surface. To get an even distribution, it’s helpful to put the flour in a strainer and tap it as if sifting.

    After the dough has risen, press it down to deflate it. Turn the dough onto your floured surface, and pat it into a rectangle about 6 inches by 12 inches by 3/4 of an inch thick.

    Distribute the cinnamon sugar evenly over the dough. Spread the raisins evenly over the dough and gently press them into it.


    Starting at a short side, keep the dough slightly taut while rolling it into a log. After rolling, pinch the seam to seal it. Place the loaf into an oiled 9 by 5 inch loaf pan, and cover with oiled plastic wrap. Let proof at room temperature for another 20 minutes.


    While the bread is proofing, preheat oven to 425 degrees. (The top of the stove while the oven is preheating is a good place to proof the loaf.)


    Bake for 15 minutes at 425 degrees. Lower oven temperature to 375 degrees and bake for an additional 20 minutes, or until an inserted knife or toothpick comes out clean

    Let the loaf cool in the pan for 5 minutes, then remove the bread from the pan and place the loaf on a rack to cool. (Let cool completely before slicing, or the bread will fall apart.)

    As promised, click here for a copy of the recipe in .pdf format!

    I hope you enjoy this tasty, crusty breakfast bread, and that you’ll come back next week for another kitchen-tested, reduced-fat recipe! Till then, stay well, keep it about the food, and always remember to kiss the cook. ;-)


Easy, Fresh Italian Bread

    A warm welcome to new subscriber Margot!

    As part of last week’s recipe for a delicious spaghetti and homemade meatballs dinner with an easy-to-prepare no-cook tomato sauce, I promised to come back with directions for the fresh-baked Italian bread I served on the side. Today I keep that promise.

    What’s that you say? Baking bread is difficult? Not at all! Although we’ll be making ours by hand, remember that some people make bread by putting the ingredients in a bread machine, walking away, and coming back later when the bread is finished, with the machine having done all the work; how much thinking could be involved? This is especially true of Italian bread, which is usually kept simple because one of its main purposes is mopping that delicious sauce from the entrée plate, and you wouldn’t want embellish it with herbs or other savory flavors that might conflict with your sauce. (That said, it’s also mighty good gently dipped in a small dish of either plain or herbed extra virgin olive oil. I like a dash of vinegar too, but that’s just me.)

    If you’re concerned that bread takes hours to make, I have more good news. While it’s true that several hours will pass between the time you start to the time you have fresh, warm bread to serve, for almost all of it the dough is doing the work while you’re off living your life. In the culinary world, this is known as “inactive time.”

    Among the few simple ingredients this recipe uses is bread flour. That’s not the same thing as all-purpose flour, but it’s easy to find right next to it in the baking aisle at any supermarket. For a quick description of what the difference is, here’s a link to a recipe for Savory Crust Pizza posted here previously.

    This introduction to bread-making would be incomplete without this bit of wisdom I read in a wonderful book call, “How I Learned to Cook” by Kimberly Witherspoon and Peter Meehan. It's a compilation of early experiences related by a collection of well-known chefs. One of the chapters was from Nancy Silverton, co-founder (and bread expert) of a number of high-level restaurants in California. What she said, which I simply loved, included this:

    "I realized I couldn't think about bread the way I thought about pastry or pasta or any other typical culinary undertaking. Bread is alive. Minor inconsistencies are a fact of life, not a mark of failure. The tiny variation in the loaves from day to day made them unique, not imperfect. And the relationship of a baker to her bread is like any other kind of serious relationship you have with anybody in life. It's never perfect. It takes so much work. And every time you think that you've mastered it, the next day you're brought back to reality and it needs some more work."

    Let’s bake some fresh bread! This recipe makes four 4 loaves.

    Dissolve 1 package (1/4 oz.) dry yeast and ½ teaspoon of sugar in 2 cups of 110 degree F water and let it rest for about five minutes. (The mixture should foam while resting.)

    Sift 1-1/2 pounds of bread flour, setting another ¼ pound aside for adding later if needed for texture. (It’s easier to add flour to a dough that’s too moist than it is to add liquid to a dough that’s too dry.)

    Add 1 tablespoon of salt and mix well, since direct contact with the salt will kill the yeast in the next step.)


    Add water-yeast mixture and mix to form dough.

    Knead for 8-10 minutes until the dough becomes smooth and elastic, and just a bit sticky. (You can do this by hand, but it’s easier with a stand mixer fitted with the dough hook attachment.)

    Place dough in a well oiled bowl and let stand until about double in size. (Usually 1-2 hours.) The stove top or the top of the refrigerator are good places for this.


    After the dough has doubled in size, pressing down with hands to deflate it, then turn it out onto your counter and divide it into four portions.


    Press each portion into an oval.


    Fold the long sides toward the center. Press out again and repeat.


    Using palms, roll each into a cylinder 12 inches long. (Start with palms in the middle and work toward the ends to make the cylinders longer. Don’t pull the dough, which will toughen the gluten in the flour.)

    Place each cylinder on a baking sheet dusted with cornmeal. Cover loosely with oiled wrap and “bench-proof” until doubled, about 45 minutes – 1 hour. While the loaves are proofing, pre-heat the oven to 500 degrees.

    When the loaves have finished proofing, make three lengthwise cuts on top of each loaf. Place each loaf in oven and bake until browned, about 10 minutes.

    Lower the temperature of the oven to 400, and continue baking for another 20-25 minutes until well-colored. Let the loaves cool a bit on racks.

    Happy bread-making!

    See you next week with another delicious, kitchen-tested recipe made from easy-to-find ingredients. Till then, stay well, keep it about the food, and always remember to kiss the cook. ;-)

Bruschetta Chicken


    It’s probably unusual for an idea for a recipe to originate with a disappointment. This one did.


    Earlier this year, while having dinner at a popular chain restaurant, I ordered a dish they called Bruschetta Chicken. It sounded good and, truth be told, it was, but there was nothing about it that said bruschetta to me. Deconstructed bruschetta? Maybe. But not bruschetta. I decided, right there in the restaurant, to create the Bruschetta Chicken I saw in my head when I first read the name: a comically large but otherwise normal bruschetta, a seasoned chopped tomato mixture on a toasted slice of good Italian bread normally served in much smaller portions as an appetizer, except topped with chicken. A kind of “Bruschetta a la Flintstone.”


    It took awhile to get around to, but I’m happy to present the recipe below for what I have to believe is the world’s largest bruschetta. (To give a sense of scale, one Italian bread, which normally makes a dozen or more appetizer size bruschettas, is used here to make four meal-size ones.) A few comments before we get to the recipe itself:

    • Although this could be made with boneless chicken breast or chicken tenders, I used drumsticks and trimmed the meat off after they were cooked. This took longer than using one of the boneless chicken parts, but also gave me the advantage of cooking the chicken bone-in, which enhances the moisture and flavor, and also allows the person doing the cooking to decide whether to keep the skin on or go skinless.

    • I would be remiss not to acknowledge the braising liquid as being based on one created by Anne Burrell, my favorite culinary mad-woman, and the idea of roasting the tomato topping mix (instead of just using it cold as in the usual bruschetta method) as being from Rachel Ray. The shoulders of giants, and all that…


    This recipe makes 4 meal size bruschettas.


    Using paper towels, dry the outside of 1 pound of chicken breast or tenders, or two pounds (about 6) drumsticks. Season the chicken with salt and fresh ground black pepper.


    Add just enough olive oil to a large, hot pan to coat the bottom. Add the chicken and cook till browned (usually about 6-8 minutes per side), turning as each side is done. When the chicken is browned, set it aside.


    Pour 2 cups of dry white wine (I use chardonnay) into the same pan and simmer till reduced by half. Add 4 cups fat-free chicken broth; 1 tablespoon fresh thyme or 1 teaspoon dried thyme; and 1 tablespoon fresh rosemary or 1 teaspoon dried rosemary to form a braising liquid. Stir to combine and add the browned chicken. Cover and simmer for about 30 minutes. While the chicken is browning and braising, prepare the tomato mixture and bread as described below.


    To cut the Italian bread into large bruschetta pieces:

    • Working length-wise, cut away just enough of the top and bottom crusts to expose the soft bread inside.

    • Cut the bread in half along the short dimension.


    • Cut each of those pieces in half horizontally. The result should be four similar pieces, each half the length of the original bread and with exposed bread on the top and bottom and crust on three of the four edges. 


    Pre-heat the oven to 400 degrees. While the oven pre-heats, combine the following in a bowl: one 28 ounce can diced plum tomatoes (drained but not rinsed); 2 tablespoons of olive oil; 1-1/2 tablespoons of dried basil or 4 tablespoons of chopped fresh; 2 teaspoons balsamic vinegar; 3 tablespoons finely chopped onion; 2 cloves finely chopped garlic; and salt and pepper to taste.


    Place the tomato mixture in a baking dish, and spread the bread out onto a baking pan in a single layer. Place both in the oven and bake for 15-20 minutes till the bread is crisp, turning the bread over half-way. Keep an eye on the bread so that it doesn’t burn.


    Rub the tops of the bread with two whole garlic cloves (using ½ clove per bread slice), and drizzle the tops lightly with olive oil.


    Divide the chicken evenly onto the bread slices. (If using drumsticks, cut the chicken off of the bone before putting the pieces on the bread.)


    Cover each with the tomato mixture, and top with a pizza-type cheese mixture. (I used a packaged Kraft reduced-fat Italian cheese mixture of mozzarella, provolone and parmesan, but anything along those lines should do as well.) Be careful not to overdo the cheese; remember, the finished dish should resemble a bruschetta, not chicken parmesan.


    Put the baking tray back in the oven only until the cheese melts, being careful not to burn the bread. Serve warm or hot with side dishes of choice. (In the photo at top, I served the chicken bruschetta with mini rotini pasta and tomato sauce, and a tossed salad. To tie all the parts together, the wine is the chardonnay used to braise the chicken.)

    Bonus Recipe: I recently started including with each week's recipe a link to a previous Kissing the Cook recipe so that folks who weren’t “in the family” when it was first published can get a look. This week’s bonus: Fluffy (and Reduced Fat!) Blueberry Pancakes with Fresh Made Strawberry Syrup.


    Hope you enjoy having these very special bruschettas! And don’t forget to visit again next week for another easy, delicious, kitchen-tested recipe. Till then, stay well, keep it about the food, and always remember to kiss the cook. ;-)