Showing posts with label blueberry. Show all posts

For Earth Week: Reduced-Fat Planet Earth Sandwich Cookies with Blueberry Cream Filling

    Want a cookbook-style copy of this recipe? No problem…just click HERE.

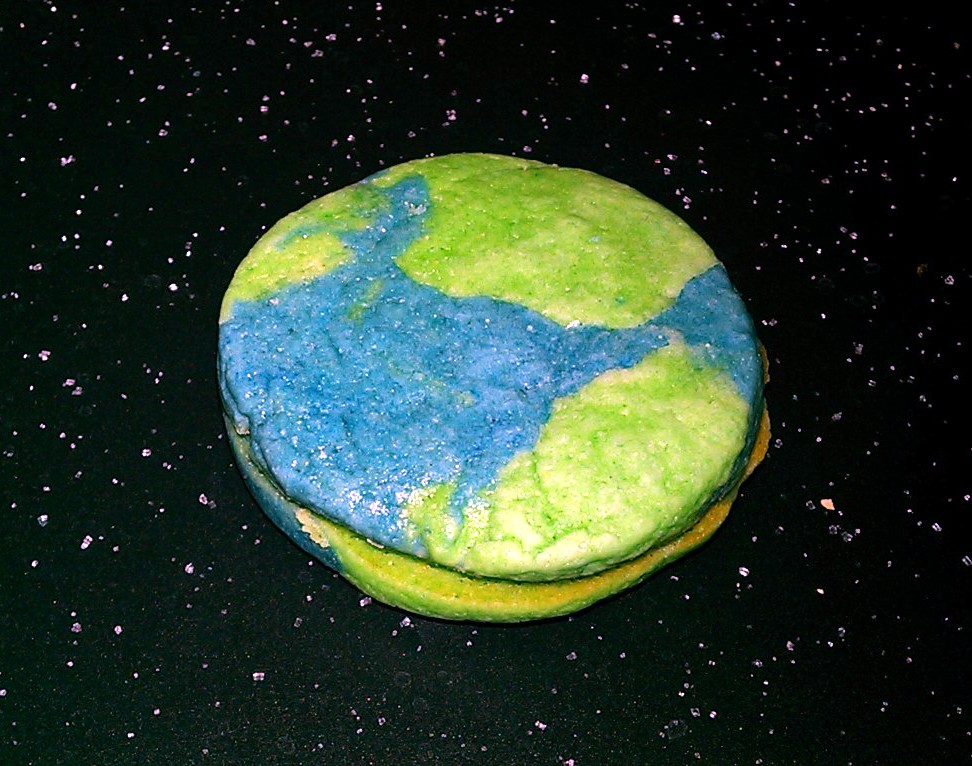
    Saving the earth is usually considered a good thing. But when the earth in question is a delicious Reduced-Fat Planet Earth Sandwich Cookie with Blueberry Cream Filling, it’s best eaten, not saved.


    These novel cookies not only taste great, they’re surprisingly easy to make. Kids will love them because they look fun and, well, because they’re cookies! Adults will love them because of the grown-up blueberry cream filling. (And because they look fun and are cookies, too! If they say it’s just the filling they’re drawn to, just nod your head politely to make it look as if you believe them.)

    Some Cook’s Notes before we begin:
    • The cookie portion is made from a sugar-cookie dough. This article includes the sugar-cookie recipe I like to use, but if you already have your own favorite sugar-cookie recipe, feel free to substitute it.
    • If you prefer a cream filling other than blueberry, it’s no problem! Just substitute the fruit preserves of your choice for the blueberry preserves in the recipe.

    This recipe makes about 18 large (3”) sandwich cookies, or 36 single-layer sugar cookies

    First, let’s make our sugar cookie dough:

    Sift together 5 cups of all-purpose flour, 1-1/2 tsp baking powder, and ¾ tsp salt.


    In a separate bowl, beat 1-3/4 cups of sugar and 1 cup plus 2 Tbsp butter substitute till smooth and light in color. (Butter substitutes tend to be either firm textured or soft; choose a soft one for this, and don't leave it out to get to room temperature  as you would with full-fat butter.)


    Mix 2 egg substitute and 1 tsp vanilla extract into the butter substitute mixture.


    Separate the butter substitute mixture into 2/3 and 1/3 portions.


    Mix 2/3 of the flour mixture and some blue food coloring into the 2/3 portion, and 1/3 of the flour mixture and some green food coloring into the 1/3 portion. (Because the dough is naturally yellow, for the blue dough it will be necessary to use a substantial amount of blue food coloring to overcome the green color that comes from mixing blue and yellow.)

    Wrap the two batches of dough in plastic wrap and place in the freezer for 1 hour. (For working with butter substitute, I've found chilling dough in the freezer works better than chilling it in the refrigerator as you would with regular full-fat butter.)
     
    While the dough is chilling, make the cream filling as follows:

    Melt 1 cup of blueberry preserves and 2 Tbsp butter substitute in a medium saucepan over low heat.


    Mix in ½ cup of fat-free half-and-half, little by little, waiting till each addition is incorporated before adding more. (Adding it too quickly may cause it to separate.)


    Simmer until the mixture is reduced by half, stirring very often avoid burning. Once the mixture is reduced, pour into a separate bowl and set aside until ready to use.

    Prepare the “earth dough” as follows:

    Cut the two chilled doughs in half, and keep each portion in the freezer until you’re ready to use it.

    Break the green dough into small pieces and spread them out on a surface dusted with confectioner’s sugar.


    Break the blue dough into pieces that are somewhat larger than the pieces of green dough. Place them in between the green pieces and use your hands to press them down so that they start to join together and start to resemble a flat earth-map.

    Roll the dough out to about ¼” thick. (Covering it with wax paper while you roll the dough makes the clean-up easier later.) Using a 2-1/2” round cookie cutter, cut out rounds that look like earth globes. (After you’ve cut as many as you can, gently press the pieces together and roll it a second time to ¼” thick. You'll find the dough can be rolled a second time without over-developing the gluten and making the dough tough. Cut out more 2-1/2” rounds that resemble earth globes.)

    Lay the cookies out on baking sheets lined with parchment or silicon sheets as shown in the photo above. Allow enough space in between for the cookies to expand to about 3”.

    Bake at 375 degrees till firm, about 10 minutes, turning half-way. (As always when using two baking sheets, stagger them in the oven to allow the heat to circulate for more even baking.)

    Let the finished cookies rest on the baking sheet for a minute or two, then remove to a cooling rack.


    If you want to serve these as single layer sugar cookies, you’re done! To serve as sandwich cookies:

    After the cookies and cream filling have cooled, place half of the cookies on the counter, flat side up.


    Spread some filling on each of the cookies.


    Place an unfrosted cookie on top of each, flat side down, to form sandwich cookies.


    And there you have it. The world may not be your oyster, but – for Earth Week, at least – it’s your cookie, and I’d choose cookies over oysters any day!

    Like what you see? For a notebook-ready, cookbook-style copy of this recipe, just click HERE.


    Have a great Earth Week, and I look forward to seeing you again next week for another fun recipe! Till then, stay well, keep it about the food, and always remember to kiss the cook. ;-)

Peach-Blueberry Pie with Reduced-Fat Pie Crust


    There are certain foods I call “white shirt” dishes. These are foods that, like a white shirt, are a can't-go-wrong choice for almost any situation. In my view, a good fresh-baked fruit pie is one of these. Pie has been served by people in all walks of life for centuries, and with good reason: it’s basic, classic, delicious, and will be welcomed practically anywhere food is being served.

    Another bonus: despite what you may think if you've never made one, pies are stunningly easy to make, even if you’re working completely from scratch. And even if you’re using a lattice top, simple step-by-step instructions for which are included below.

    If all of that seems like a big responsibility for a humble baked good to carry, don’t worry. Pie can handle it, including the one I’m happy to bring to you today: Peach-Blueberry Pie.

    A few cook’s notes:

    Pie Crust: Use any you like, home-made or purchased, but to reduce the fat content I recommend a reduced-fat version I use on pretty much anything requiring a pie crust. The recipe, which is a slightly jazzed-up version of the one previously posted here under the title, “Impossible Pie Crust,” follows.

    Fruit for the Filling: Although I’m not usually a fan of canned ingredients, for recipes like this I don’t at all mind using canned peaches if fresh, juicy ones are not in season. Similar to the reason canned tomatoes are often used in cooking by people who would otherwise never get near a can opener, canned peaches have a more consistent quality than fresh ones. (Just be sure to drain them very well, since they can bring a lot more liquid to your filling than fresh peaches will.) Fresh blueberries, however, are much better to use than the frozen ones. For reasons best left to the chemists to figure out, I’ve found that blueberries tend to toughen up when frozen and thawed.

    Tapioca: While it’s possible to thicken with corn starch, using tapioca leaves a cleaner taste. For pie fillings, use instant tapioca; regular tapioca will still thicken but miniature tapioca pearls will be visible. Also, tapioca works best at fairly hot temperatures; I usually bake pies at 350 degrees, but with a tapioca-thickened filling I’ll bake at 425 for a shorter time. Letting your fruit come to room temperature before adding it to the filling also helps the tapioca’s thickening effect.

    Thank you, Chef Alex: Credit to Alex Guarnaschelli for the simple but near-genius idea of adding preserves to pie filling.

    Enough chit-chat…let’s make some pie! This recipe makes one 9” pie.

    First, the low-fat pie crust. Since it’s just as easy to make four crusts as it is to make two, this recipe makes four crusts. (You’ll need two for the Peach-Blueberry pie, and can freeze the other two for up to three months.) Once you have the other two available in the freezer, you’ll think of all kinds of things to do with them!   

    Combine 1 cup of apple juice, ½ teaspoon cider vinegar and 2 teaspoons of salt and put into freezer until almost icy.

    In a mixing bowl, combine 1-1/2 pounds of all-purpose flour, 8 ounces of cake flour, and 6 tablespoons of sugar. Blend in 16 ounces of firm-textured butter substitute (cut into cubes or chunks) until the mixture resembles a coarse meal with visible pieces of butter substitute.

    Add the juice mixture and blend until the dough holds together when pinched.


    Divide the dough into four equal parts and wrap each in plastic. Chill two in the refrigerator for one hour, and label and freeze the other two for future use.


    Now let’s make our filling!

    Preheat the oven to 425.

    Blind bake pie shell. (If you’re not familiar with how to do this, fear not; click here for a short tutorial video!)

    While shell is blind baking, combine the following filling ingredients: 3-1/2 cups room temperature peaches, pitted, peeled and sliced into wedges; 1 cup room temperature fresh blueberries; 3/4 cup light brown sugar; juice and zest of one lemon; 6 tablespoons instant tapioca; 12 ounces peach preserves; 1/2 teaspoon vanilla extract; 1/2 teaspoon cinnamon; 1/4 teaspoon nutmeg; and 1/2 teaspoon salt. Let the mixture rest for 10 – 15 minutes so the tapioca can absorb liquid.

    When the bottom crust is ready, put the filling in, using a slotted spoon and draining the each spoonful very well before placing it in the pie shell. (Reserve the liquid for use to glaze the pie later.) Dot with butter substitute. [Ed. Note: When making the pie in the photo, I confess to having forgotten to add the butter substitute. Fortunately, since this was a lattice-top pie, I was able to apply it later.]

    Apply solid or lattice top. To make a lattice top:
    • Roll out the dough for the top crust large enough to fit over the pie shell. (This is the same as you would do if you were using a solid top.)
    • Slice the rolled out dough into strips. (I use about ¾” wide strips, but you can make them however wide you like. Many people make a lattice top with strips 1-1/2” to 2” wide strips.)
    • Place an odd number of strips across the top of the filled pie shell. The center strip should go right down the middle of the pie, and the other strips should be spaced evenly on either side of it.
    • Fold down every second strip as shown, and lay another strip across the unfolded strips as shown.

      • Unfold the folded strips.


        • Fold down the strips that weren’t folded the first time and lay a strip across the unfolded strips as shown.


          • Repeat until half the pie has a lattice top.


            • Working in the opposite direction, form the lattice top for the other half of the pie.


              • Using a kitchen scissor, trim the excess length from the strips. (Don’t pull it off by hand, which can overwork the gluten in the dough and make it tough.)

              Wet a finger with cold water and rub it along the edges of the crust to make a smooth seal between the top crust and the bottom crust.


              (Shown here with the finished edge.)


              Place the pie in the oven.


              After about 35 minutes, brush the reserved liquid onto the top crust as a glaze, and continue baking until the top is golden brown, about another 10 minutes. (Check the pie periodically during the entire baking time and, if the edges start to brown before the rest of the pie, cover the edges with foil or an aluminum collar.)

              Let the pie cool before serving to allow the filling to thicken properly.

              All that’s left is to put up a pot of coffee and invite some friends over to share your delicious pie! (Just don’t tell them how easy it is to make.)


              Come back next week for another reduced-fat, easy-to-make, home-tested recipe! Till then, stay well, keep it about the food, and always remember to kiss the cook. ;-)

            Bruschetta Chicken


              It’s probably unusual for an idea for a recipe to originate with a disappointment. This one did.


              Earlier this year, while having dinner at a popular chain restaurant, I ordered a dish they called Bruschetta Chicken. It sounded good and, truth be told, it was, but there was nothing about it that said bruschetta to me. Deconstructed bruschetta? Maybe. But not bruschetta. I decided, right there in the restaurant, to create the Bruschetta Chicken I saw in my head when I first read the name: a comically large but otherwise normal bruschetta, a seasoned chopped tomato mixture on a toasted slice of good Italian bread normally served in much smaller portions as an appetizer, except topped with chicken. A kind of “Bruschetta a la Flintstone.”


              It took awhile to get around to, but I’m happy to present the recipe below for what I have to believe is the world’s largest bruschetta. (To give a sense of scale, one Italian bread, which normally makes a dozen or more appetizer size bruschettas, is used here to make four meal-size ones.) A few comments before we get to the recipe itself:

              • Although this could be made with boneless chicken breast or chicken tenders, I used drumsticks and trimmed the meat off after they were cooked. This took longer than using one of the boneless chicken parts, but also gave me the advantage of cooking the chicken bone-in, which enhances the moisture and flavor, and also allows the person doing the cooking to decide whether to keep the skin on or go skinless.

              • I would be remiss not to acknowledge the braising liquid as being based on one created by Anne Burrell, my favorite culinary mad-woman, and the idea of roasting the tomato topping mix (instead of just using it cold as in the usual bruschetta method) as being from Rachel Ray. The shoulders of giants, and all that…


              This recipe makes 4 meal size bruschettas.


              Using paper towels, dry the outside of 1 pound of chicken breast or tenders, or two pounds (about 6) drumsticks. Season the chicken with salt and fresh ground black pepper.


              Add just enough olive oil to a large, hot pan to coat the bottom. Add the chicken and cook till browned (usually about 6-8 minutes per side), turning as each side is done. When the chicken is browned, set it aside.


              Pour 2 cups of dry white wine (I use chardonnay) into the same pan and simmer till reduced by half. Add 4 cups fat-free chicken broth; 1 tablespoon fresh thyme or 1 teaspoon dried thyme; and 1 tablespoon fresh rosemary or 1 teaspoon dried rosemary to form a braising liquid. Stir to combine and add the browned chicken. Cover and simmer for about 30 minutes. While the chicken is browning and braising, prepare the tomato mixture and bread as described below.


              To cut the Italian bread into large bruschetta pieces:

              • Working length-wise, cut away just enough of the top and bottom crusts to expose the soft bread inside.

              • Cut the bread in half along the short dimension.


              • Cut each of those pieces in half horizontally. The result should be four similar pieces, each half the length of the original bread and with exposed bread on the top and bottom and crust on three of the four edges. 


              Pre-heat the oven to 400 degrees. While the oven pre-heats, combine the following in a bowl: one 28 ounce can diced plum tomatoes (drained but not rinsed); 2 tablespoons of olive oil; 1-1/2 tablespoons of dried basil or 4 tablespoons of chopped fresh; 2 teaspoons balsamic vinegar; 3 tablespoons finely chopped onion; 2 cloves finely chopped garlic; and salt and pepper to taste.


              Place the tomato mixture in a baking dish, and spread the bread out onto a baking pan in a single layer. Place both in the oven and bake for 15-20 minutes till the bread is crisp, turning the bread over half-way. Keep an eye on the bread so that it doesn’t burn.


              Rub the tops of the bread with two whole garlic cloves (using ½ clove per bread slice), and drizzle the tops lightly with olive oil.


              Divide the chicken evenly onto the bread slices. (If using drumsticks, cut the chicken off of the bone before putting the pieces on the bread.)


              Cover each with the tomato mixture, and top with a pizza-type cheese mixture. (I used a packaged Kraft reduced-fat Italian cheese mixture of mozzarella, provolone and parmesan, but anything along those lines should do as well.) Be careful not to overdo the cheese; remember, the finished dish should resemble a bruschetta, not chicken parmesan.


              Put the baking tray back in the oven only until the cheese melts, being careful not to burn the bread. Serve warm or hot with side dishes of choice. (In the photo at top, I served the chicken bruschetta with mini rotini pasta and tomato sauce, and a tossed salad. To tie all the parts together, the wine is the chardonnay used to braise the chicken.)

              Bonus Recipe: I recently started including with each week's recipe a link to a previous Kissing the Cook recipe so that folks who weren’t “in the family” when it was first published can get a look. This week’s bonus: Fluffy (and Reduced Fat!) Blueberry Pancakes with Fresh Made Strawberry Syrup.


              Hope you enjoy having these very special bruschettas! And don’t forget to visit again next week for another easy, delicious, kitchen-tested recipe. Till then, stay well, keep it about the food, and always remember to kiss the cook. ;-)